- Benefits of using a hardwire kit
- Understanding the wiring in your vehicle
- Step-by-step guide to installing a hardwire kit
- Frequently asked questions about hardwire kits
- Conclusion
Are you tired of dealing with messy wires from your dashcam? Installing a hardwire kit for your dashcam is the perfect solution! In this step-by-step tutorial, we will guide you through the process of installing a hardwire kit, eliminating the need for visible cables and messy wire management.
With our ultimate guide, you'll learn everything you need to know to complete the installation with ease. Whether you're a seasoned DIY enthusiast or a beginner, we've got you covered. We'll walk you through the tools you'll need, the key steps to follow, and offer valuable troubleshooting tips along the way.
By installing a hardwire kit, you can enjoy seamless power directly from your vehicle's electrical system. Additionally, you'll have the added convenience of continuous power supply, eliminating the need to worry about charging your dashcam regularly.
Benefits of using a hardwire kit
Installing a hardwire kit for your dashcam offers numerous benefits that make it a worthwhile investment. Firstly, it eliminates the need for visible cables and messy wire management. With a hardwire kit, you can neatly conceal the wiring, giving your vehicle a clean and professional appearance.
Secondly, a hardwire kit allows you to enjoy seamless power directly from your vehicle's electrical system. This means you won't have to rely on the limited battery life of your dashcam or worry about running out of power in critical moments. With continuous power supply, you can have peace of mind knowing that your dashcam is always ready to capture any incidents on the road.
Understanding the wiring in your vehicle
Before diving into the installation process, it's important to have a basic understanding of the wiring in your vehicle. Different vehicles may have varying electrical systems and fuse box configurations, so it's crucial to familiarize yourself with your specific model.
Locate your vehicle's fuse box, usually found under the dashboard or in the engine compartment. The fuse box contains fuses and relays that control various electrical components in your vehicle. You will need to identify a suitable fuse to tap into for powering your dashcam.
Consult your vehicle's manual or online resources to find information about the fuse box layout and the function of each fuse. Look for a fuse that is powered when the ignition is turned on, as this will ensure your dashcam receives power only when the vehicle is in use. Avoid tapping into fuses that control critical systems, such as airbags or ABS, to prevent any interference or damage.
Once you have identified a suitable fuse, note its amperage rating. It's essential to choose a fuse tap that matches or exceeds the amperage rating of the fuse you're tapping into. This will ensure the safety and proper functioning of your dashcam.
Step-by-step guide to installing a hardwire kit
It's time to start the installation process, follow these step-by-step instructions to successfully install a hardwire kit for your dashcam:
- Start by turning off your vehicle's engine and disconnecting the negative terminal of the battery. This is an important safety precaution to avoid any electrical shocks or short circuits during the installation process.
- Identify a suitable fuse to tap into for powering your dashcam. Remember to choose a fuse that is powered when the ignition is turned on and matches the amperage rating of the fuse tap.
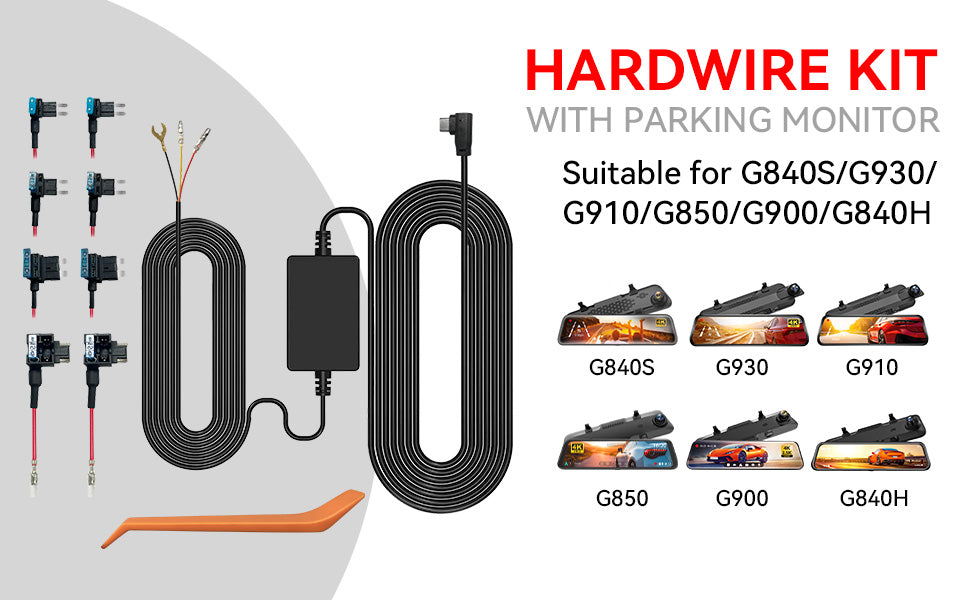
- Use the trim removal tools to carefully remove any panels or trim pieces necessary to access the fuse box and the area where you plan to mount your dashcam.
- Locate an appropriate grounding point near the fuse box. Look for a metal bolt or screw that is securely attached to the vehicle's chassis. Clean the grounding point using sandpaper or a wire brush to ensure a solid electrical connection.
- Connect the red wire from the hardwire kit to the ACC fuse. Use a fuse tap and connector provided with the hardwire kit for a secure connection. Ensure the connection is tight and insulated using electrical tape. Attach the yellow wire from the hardwire kit to a fuse terminal that has constant power. Utilize a fuse tap or adapter to facilitate this connection. This ensures the dash cam receives power continuously, even when the ignition is switched off.
- Connect the black wire from the hardwire kit to the grounding point you identified in step 4. Again, use a connector provided with the hardwire kit and ensure a secure and insulated connection.
- Route the wiring from the fuse box to the area where you plan to mount your dashcam. Use zip ties to secure the wiring and prevent any interference with vehicle controls.
- Connect the hardwire kit's connector to the dashcam's power input. Ensure a secure connection and use electrical tape to insulate the connection.
- Double-check all the connections, ensuring they are secure and properly insulated. Inspect the wiring for any signs of damage or exposed wires.
- Reconnect the negative terminal of the battery and turn on the ignition to test the dashcam's functionality. If everything is properly connected, your dashcam should power on and start recording when the ignition is turned on.

Congratulations! You have successfully installed a hardwire kit for your dashcam.
Frequently asked questions about hardwire kits
Q: Can I install a hardwire kit myself, or do I need professional help?
A: While installing a hardwire kit can be done by a DIY enthusiast, it's important to have a basic understanding of your vehicle's electrical system and wiring. If you're unsure or uncomfortable with the installation process, it's best to seek professional help to avoid any potential damage to your vehicle.
Q: Will installing a hardwire kit void my vehicle's warranty?
A: Generally, installing a hardwire kit for your dashcam should not void your vehicle's warranty. However, it's always a good idea to consult your vehicle's warranty documentation or contact the manufacturer for clarification.
Q: Can I use a hardwire kit for any dashcam model?
A: Hardwire kits are typically designed to be compatible with specific dashcam models. It's important to ensure that the hardwire kit you purchase is specifically designed for your dashcam model to ensure proper functionality and compatibility.
Q: Can I remove the hardwire kit and revert to using the 12-volt accessory socket?
A: Yes, if you decide to remove the hardwire kit, you can revert to using the 12-volt accessory socket. Simply disconnect the hardwire kit from the fuse box and the dashcam, and you can use the socket for other purposes. However, keep in mind that removing the hardwire kit may require reinstallation if you decide to use it again in the future.
Conclusion
Installing a hardwire kit for your dashcam is a smart and practical solution to eliminate messy wires and ensure continuous power supply. By following our comprehensive step-by-step guide, you can successfully install a hardwire kit and enjoy the benefits of a clean and professional-looking installation.
Remember to gather all the necessary tools and materials, familiarize yourself with your vehicle's wiring, and prioritize safety throughout the installation process. Don't forget to test and troubleshoot the installation to ensure everything is working properly.
With a hardwire kit, you can say goodbye to messy wires and enjoy the convenience of continuous power for your dashcam. Whether you're a seasoned DIY enthusiast or a beginner, our ultimate guide has provided you with the knowledge and confidence to complete the installation with ease.
So, what are you waiting for? Take control of your dashcam's power supply, and enjoy a clutter-free and reliable recording experience on the road. Happy installing!

Leave a comment
This site is protected by hCaptcha and the hCaptcha Privacy Policy and Terms of Service apply.