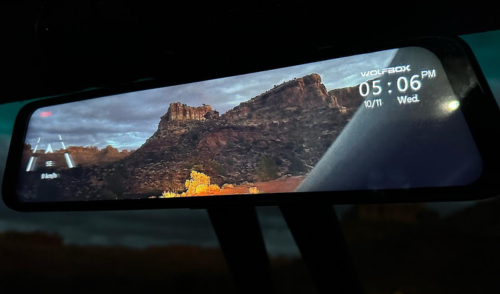
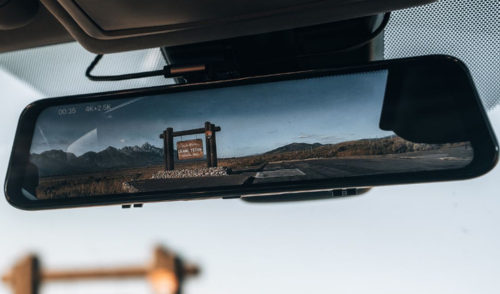
Enhancing your driving experience and safety with a WOLFBOX dash cam involves choosing the right installation method that best suits your vehicle and preferences. Our guide explores three distinct mounting options - strap mount on the rearview mirror, OEM Bracket mount replacing the original mirror, and center console mount. Here’s how you can install your dash cam using each method, complete with step-by-step instructions.
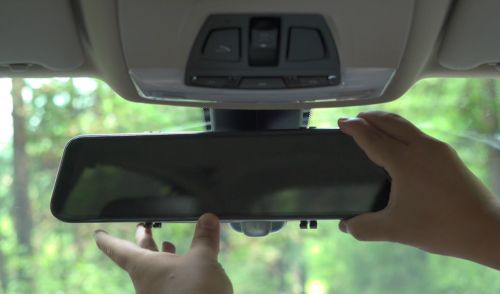
Strap Mount on Rearview Mirror
Effortless Installation with Strap Mount
The strap mount is straightforward and avoids any permanent changes to your vehicle. It's ideal for those who prefer a non-invasive setup.
Compatibility:- Supported Models: Supports all mirror dash cams
- 2 silicone straps
- WOLFBOX dash cam
- Step 1: Clean the rearview mirror to remove any dust or grease, ensuring a secure fit for the straps.
- Step 2: Position the dash cam against your rearview mirror, aligning it so the camera has an unobstructed view.

- Step 3: Secure the dash cam by wrapping the silicone straps around the rearview mirror and fastening them tightly.

- Step 4: Adjust the dash cam to ensure it captures the desired field of view.
- Step 5: Connect the device to your vehicle’s power source using the instructions provided.
OEM Bracket Mount Replacing Original Mirror
Seamless Integration with OEM Bracket
Replace your original rearview mirror with the WOLFBOX dash cam for a sleek and integrated appearance.

- Supported Models: G900, G850, G840H, G840S
- Vehicle Compatibility: Supports only certain vehicle models. check now>>>
- OEM bracket
- 4 screws
- WOLFBOX dash cam
Installation Steps:
When choosing to install your WOLFBOX dash cam using an OEM bracket, the process can be broken down into two main steps: first, mounting the OEM bracket to the dash cam itself, and then securing the entire assembly inside the vehicle. Here are the detailed instructions for each step to ensure a smooth installation process.Step 1: Mounting the OEM Bracket to the Dash Cam
Installation Instructions:
- Remove the protective taps on the back of the dash cam: Use an appropriate tool, such as a small flathead screwdriver, to gently pry off and remove these taps.
- Unscrew the screws behind the taps: Use a screwdriver to completely remove the screws and set them aside temporarily.
- Prepare the OEM bracket’s backing plate: Take out the OEM bracket’s backing plate, ensuring that the holes on the plate align with the screw holes on the back of the dash cam.
- Secure the backing plate to the dash cam: Reinsert the screws from step 2 and use them to secure the backing plate to the back of the dash cam unit.
- Attach the bracket handle: Connect the handle part of the OEM bracket to the backing plate, ensuring all connection points are tight.
- Check the assembly: Ensure all parts are securely fastened and there is no looseness.

Step 2: Securing the OEM Bracket Inside the Vehicle
Installation Instructions:
- Remove the existing mount in the vehicle: Carefully use a screwdriver to remove the bracket or mount that is currently in place within the vehicle.
- Keep the base of the existing mount: Ensure the base of the original mount remains in the vehicle, serving as the mounting base for the new OEM bracket.
- Align the OEM bracket with the base: Position the OEM bracket on top of the existing base, making sure the holes align.
- Secure the bracket to the base with screws: Insert screws through the holes in the OEM bracket and screw them into the base, ensuring the bracket is firmly installed.

Center Console Mount
Innovative Placement with Center Console Mount
For those who prefer their dash cam off the windshield, the center console mount is an excellent alternative that keeps the dashboard uncluttered.
Compatibility:- Supported Models: Supports all mirror dash cams
- Center console mount
- WOLFBOX dash cam
- Step 1: Thoroughly clean the area of the center console where the mount will be placed to ensure the adhesive sticks well.
- Step 2: Peel off the protective film from the 3M adhesive pad on the console mount.
- Step 3: Firmly press the mount onto the console, holding it for about 30 seconds to secure the bond.

- Step 4: Secure the dash cam by wrapping the silicone straps around the Center Console Mount and fastening them tightly.

- Step 5: Neatly route the power cable to the vehicle’s power supply, ensuring it does not interfere with vehicle controls or visibility.

Each installation method provides unique benefits and is designed to meet different user needs and vehicle setups. By following these detailed instructions, you can ensure a safe and efficient setup of your WOLFBOX dash cam, enhancing both your vehicle’s functionality and your driving experience.
Leave a comment
This site is protected by hCaptcha and the hCaptcha Privacy Policy and Terms of Service apply.